trains
Heavy Metal
17/01/17 22:24 Filed in: Information
I'm not normally a fan of the "un-boxing" photo or video genre; however, I'll make an exception in this case!
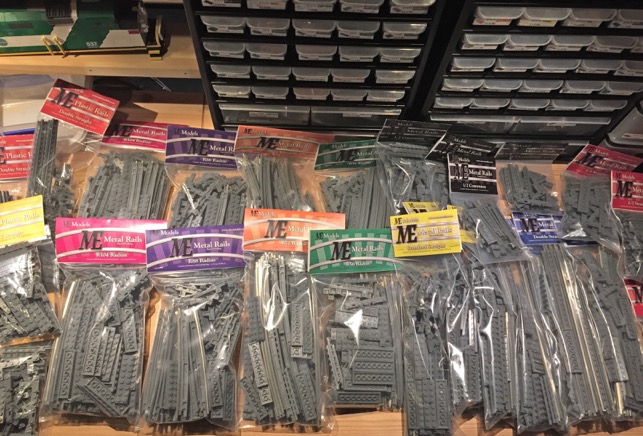
After quite a long wait, I have finally received my much anticipated delivery of ME Models metal track elements.
It appears that the wait has been worth it. Initial exploration with assembling some track sections has put to rest any anxieties of adopting a novel, yet unconventional method of metalizing plastic track. Some observations:
1) The clutch power is much improved over previous ME track. The tendency for ballasted track sections to "explode" with any subtle twisting forces, resulted in me solvent welding the rails to the ballast plates.
2) Rail joints are smooth and seamless. This is not a surprise given that these are effectively HO/OO rail sections with fishplates. This will lead to very smooth running characteristics and superb electrical performance.
3) Nickel silver rail will resist corrosion and improve electrical performance.
4) Separate rail sections will broaden the opportunity to "scratch build" a wider variety of track. I've posted some track sections built to represent precast concrete rail-beds common with many high speed railway lines.
5) Flange way clearance is better without flanges running on the rail base.
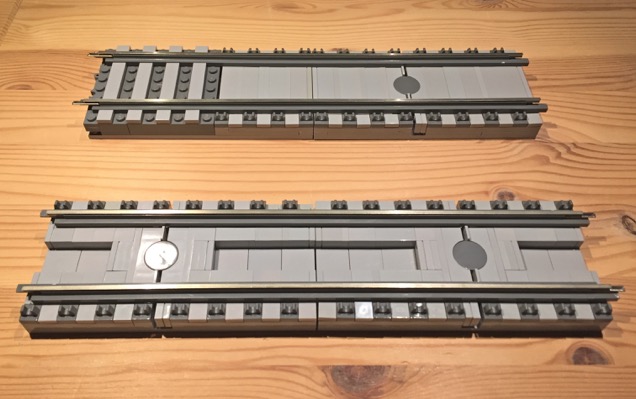
My only criticism is the possibility of creating uneven rail height during assembly. My initial tendency when assembling a rail section was to apply force on top of the rail head to secure it to the tie-plates. This would sometimes result in pushing the metal rail insert further into its groove resulting in uneven rail height. I now have to be conscious to apply force to the rail base flange rather than the rail head.
Overall, I say its a big win for us Lego train fans. The only remaining piece of the puzzle is motors with metal wheels!
Happy Holidays from Fx Bricks
21/12/16 12:48 Filed in: News
Fx who?
I guess I should come clean. A lot of the reason I haven't posted for while this year is because I've been working on this. No, not a winter village scene which can built from sets in 2 hours! :) I have been working on the electronics which power this scene as shown in this video...
These models are powered by the PFx Brick. A new product developed in collaboration with my good friend Jason Allemann (yes, the same Jason who designed the Lego Ideas marble maze). We've started a company called Fx Bricks, and we're hoping to bring the PFx Brick into production with the help of a crowd-funding campaign in the near future. We hope the PFx Brick will just be a starting point for many cool products aimed at integrating electronics with bricks.
I won't bore you with the details, you can visit fxbricks.com for that. Suffice to say, what started as an effort to bring the awesome technology of the model train world (i.e. DCC sound decoders) to Lego trains, became a more useful and general purpose product. A product which can bring the magic of lighting, sound and animation to models of any theme, shape, or size!
Merry Christmas to all my Lego friends, and all the best for 2017!
Kit 7742 TTC CLRV Streetcar/Tram Available!
14/09/15 12:04 Filed in: News
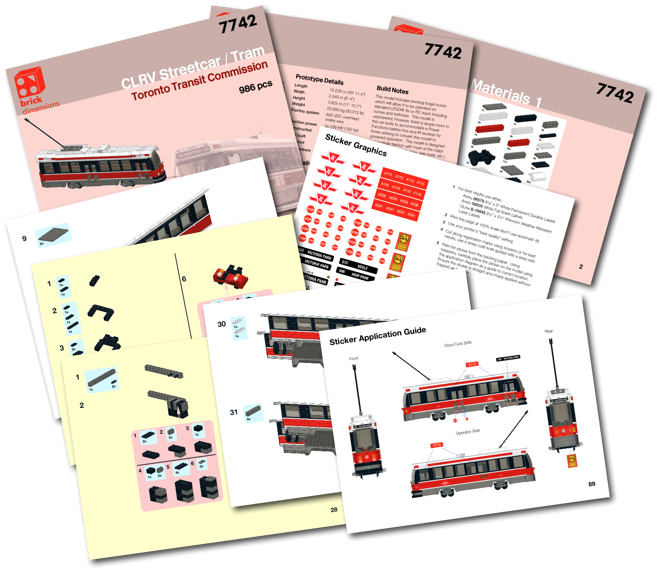
Finally, after a great deal of delay, I've completed the instructions for the Toronto CLRV streetcar/tram!
This model has generated the most feedback from folks wanting to build this model. Sadly, I've had to defer them–up until now that is! This model (like many of my others) has required redesign of many components in order to make it suitable for folks to build with relative ease. It also incorporates the use of a few helpful newer parts. One big change from my previous version of this model is the use of pivoting bogie trucks. This allows the model to be used on conventional LEGO® track including curves and switches. Initially, this model was intended as a static display model on straight track; however, a few folks asked if it could be made to negotiate all TLG track configurations--now it can!
Basic Specs:
- Piece count: 986
- Length: 57 studs
- Width: 10 studs
- Height: 83 plates (total), 49 plates (car body)
Available now in the store.
L-Gauge
05/05/15 12:27 Filed in: News
I have started a new experiment: L-Gauge.org.
L-Gauge is a unified "brand" or umbrella to capture useful information about the LEGO train hobby for both beginners and experienced alike. The name "L-Gauge" was chosen to assert itself among other traditional model train scales/gauges. It is hoped that "L-Gauge" will be perceived with the legitimacy and respect it deserves among our model train peers.
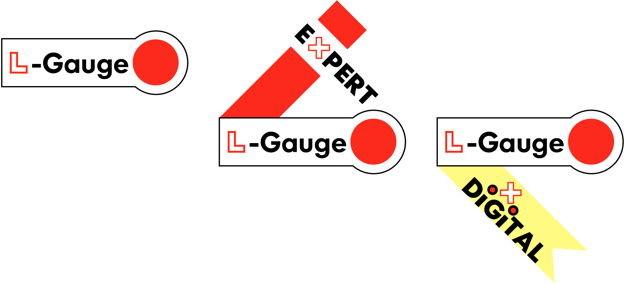
The L-Gauge logo is designed to be simple, clear, and familiar. It is an obvious acknowledgement of the familiar, yet abandoned LEGO Group logo for the Lego Trains theme. Lego Trains is no longer a distinct theme within the Lego group product range. Thus, "L-Gauge" attempts to be common voice to promote, share, and celebrate this hobby theme in the context of other Lego themes and other model train specialties.
L-Gauge is not a "standards" body. It has no official status. It does not dictate practice and methods. It is simply a community resource. A resource which I hope will be nurtured by the community itself.
L-Gauge will be built in the spirit of open source/creative commons. Its public website l-gauge.org will share its content using the familiar WikiMedia platform as used by Wikipedia and countless other organizations. This content platform will allow it to grow organically and hopefully extend into other languages.
This is by no means complete or fully categorized; however, examples of the content that L-Gauge will attempt to capture include the following:
Basic Information
- track geometry (standard and narrow gauge systems)
- reference track configurations
- suggested loading gauge(s)
- wheel profiles
- wheelbase and bogie geometries
- magnetic coupler characteristics and methods
Resources
CAD
- LDraw libraries
- BlueBrick libraries
- other addons, utilities, etc.
- LPub templates
- Ballasting standards
- Useful bogie and truck designs
- Coupler designs and methods
- Common infrastructure items (huts, signals, bridges, retaining walls, etc.)
- Reference track configurations
- Sample track plans
- Big spline curve designs
Layouts
- Modular community/LUG collaborative standards
- Other modular standards, e.g. MILS
- Baseboards/benchwork
Electrical
- 9V & DC electrical reference
- motor performance reference guide
- sample/proven drivetrain methods
- lighting and accessories
- advanced topics: DCC, Mindstorms, etc.
Future
- new track product wishlist
- new wheels, couplers, accessories wishlist
- advanced control systems
Promotion/Media
- About
- Logos and branding assets
- FAQs
References
- links to other Lego train hobby sites
- links to related commercial vendors (e.g. ME Models, Big Ben, etc.)
The L-Gauge "Expert" brand is intended for identifying topics, content, etc. which are more advanced either by complexity, cost, non-traditional/controversial methods, etc.
The L-Gauge "Digital" brand is a placeholder for now. However, I think there is a better future for integrating proven control systems like DCC into the Lego train hobby.
Initially, the MediaWiki platform will be edited by me in order to get it off the ground. Later, I will nominate additional editors/volunteers to act as a quasi-editorial board to add and curate additional content. I want all of the content on this site to be of the highest quality. It must be clear, concise and consistent. I am not sure if any "formal" governance structure will emerge or even be necessary--we shall see. For now it is a benevolent dictatorship! ;)
All I can say is stay tuned and hopefully I haven't over-extended myself with this experiment!
Updated Layout Control Panel Using JMRI
22/04/15 18:17 Filed in: Information
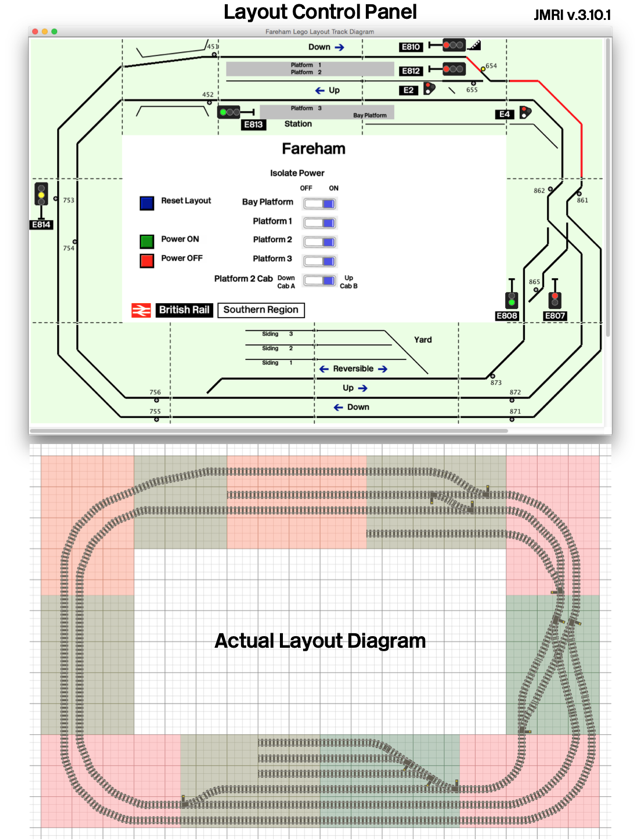
Here is an updated version of my layout's control panel implemented using JMRI, an open source model train software tool.
I have evolved this control system to include the full layout (including the yard switches) and more importantly to include "Train on Track" sensors. With these sensors, the signal system is now fully automated and interlocked. As a train passes a signal, it trips a sensor and the signal immediately changes to "Danger". The signal will progressively clear through "Caution" and "Proceed" aspects depending on the state of the signal blocks ahead.
Initially I was going to implement the train detection using a current feedback sensor on the power feeds to the track (similar to the prototype's track circuit). However, I wanted this system to operate with non metal/9V/DCC powered trains, i.e. battery/Power Functions trains. Therefore, I elected to use optical sensors embedded discretely in the track. The sensor consists of a 3mm phototransistor which is buried in a hole drilled within the ties. The sensor detects light being blocked by the presence of a train passing overhead. Each sensor is tunable to account for varying ambient light conditions depending on where the layout is setup.
The sensors as well as the actuators for the signals and turnouts are all connected using MERG's C-bus network. There are at least 16 different micro controllers lurking under the layout tables all communicating via C-bus to a central controller connected to my laptop PC via USB. The same central controller has an integrated DCC command station which drives the track power. Therefore, even the control of trains is achieved with the computer via virtual "throttles". It isn't too difficult to imagine the next step: complete automation of train operation! Well, not so fast, I still like to drive my trains too!
JMRI is a very powerful software suite of tools; however, it has a steep learning curve. For those of you with a technical interest, it is worth checking out.
Train Chassis Testbed
02/03/15 20:33 Filed in: Ideas
As part of my on-going experiments into alternative Lego train chassis and drive-train arrangements, I totally stripped down and rebuilt my GO Transit F59PH locomotive as a "technology testbed". The body was completely redesigned to be separate from the chassis and to mount to its chassis "clam-shell" style like scale model trains. This allows me to develop and iterate the chassis design independent of the locomotive. I intend to use this configuration for all my locomotives in future because I like the idea of being able to perform maintenance and tuning without a traumatic disassembly and rebuild of the entire locomotive. In fact, I hope to be able to interchange chassis among some locomotives with similar wheelbase for flexibility. I hope to be able to keep all of the mechanical and electrical infrastructure (controller, battery, motor, lights, etc.) mounted to the chassis with minimal connection to the body shell.
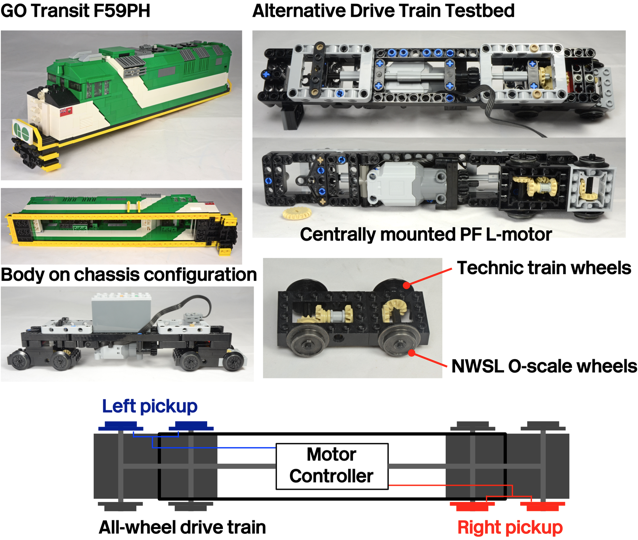
Illustrated above is some of the progress made to date. I have rebuilt the F59PH body shell--its still not finished, but very close. The chassis is my 3rd version built to date. It is powered from a centrally under-mounted PF L-motor. This keeps the centre of gravity lower and allows for more room inside the body shell. The motor drives a central drive shaft connected to gear driven 2-axle bogies. The tractive effort of this arrangement is impressive, especially with the L-motor vs. the M-motor.
The next steps will be to develop a power pickup from the metal wheels and to fabricate and develop my hybrid DCC + PF electronic control module. Lots to do, but its great fun!
New Concept for Train Control
26/02/15 10:21 Filed in: Ideas
I have been struggling with the issue of controlling Lego trains for quite some time. My layout has been built for operation with metal track and NMRA DCC control and my locomotives have been converted to run with DCC decoders attached to 9V motor bogies. However, I am worried about the future of 9V track/motors and have been bothered with the lack of performance of the 9V motor bogie.
Here are a few issues that I've been thinking about:
1) POWER - the 9V motor bogie is relatively weak and often a train requires 2x or more for sufficient traction
2) HYBRID DRIVE - I love not having to worry about batteries when operating my layout at a show. However, I like the flexibility of battery operation and for running on plastic track.
3) TECHNIC/PF CHASSIS - I have developed a few prototype locomotives where the chassis and body are completely separate. The chassis is mostly built from technic elements with an all-wheel drive train powered from a centrally located PF motor. The chassis is nominally 5-studs wide to allow for a 7-stud wide body. The all-wheel drive chassis I have built have amazing tractive effort--easily better than any 9V powered locomotive. They do run a bit slower, but its a prototypical speed which I prefer.
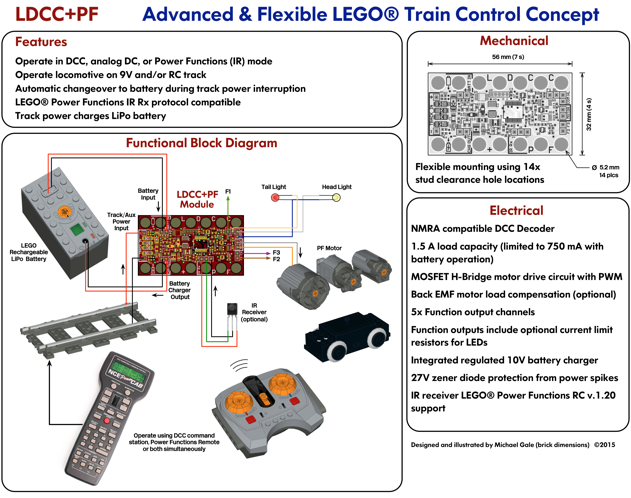
What you see illustrated above is a prototype electronic control module (which I have called LDCC+PF) which attempts to address some of the issues of train control. Effectively its a DCC decoder at its core. Unlike a DCC decoder it includes a battery/power management function and an IR receiver. Also, mechanically it is designed to fit with stud and/or technic pin attachments. This module attempts to combine the best features of DCC and Lego Power Functions. The goal is to have reliable, powerful, and flexible locomotive operation.
The idea is that the motor is always controlled using a smart DCC decoder. It will take commands from DCC encoded packets on the track and/or commands from the PF IR remote. It will extend the functionality of the PF remote by allowing for DCC standard 14/28/128 speed steps and interpreting button presses+channel selection for function control. In some ways, you could consider this module a functional replacement for the Lego PF IR receiver (obviously with tons of additional functionality!)
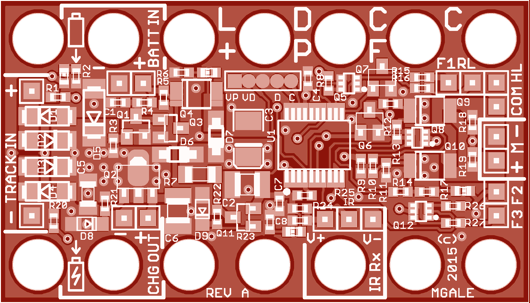
So far I have more-or-less completed the electrical design and printed circuit board (PCB) (shown below). I have fabricated the prototype PCBs and they are currently being tested. I have made a preliminary start on the firmware for the module's micro controller--but this will take a great deal of time. I do have a bit of a head start since I have based the DCC decoder design on MERG's DEC12 decoder. I am implementing totally new firmware on a different micro controller than the MERG design written in C rather than assembler. I also have to implement all of the Lego PF IR protocol in addition to the DCC.
I hope this experiment turns out--I do look forward to my ambition of a hybrid-drive train chassis!